


Little Lady
Complete your coordinating set by knitting a cute beanie to match the stylish cardigan in issue 6 of i can make it myself .
This project was made by the Patons Design Team.
You will need...
Shepherd Colour 4 Me 8 ply yarn: 1 x 50g ball black (4969)
Shepherd Colour 4 Me 8 ply yarn: 1 x 50g ball red (4967)
Loopy Mohair yarn: 1 x 50g ball black (7)
6 ladybug buttons
Knitting needles: 4.00mm, 5.50mm
Wool needle
Dimensions: This garment is designed to fit a three-year-old for a generous fit. It can also be made in six different sizes.
Age (years) 1 1.5 2 3 4 5
Hat fits head (approx.) cm 45 48 48 52 52 52
The amount of yarn in the materials list is for making a hat to fit a one-year-old. When making this garment for older children, additional yarn may be needed:
One-and-a-half-year-old - one ball of black Colour 4 Me yarn, one ball of red Colour 4 Me yarn and one ball of Loopy Mohair yarn
Two-year-old - one ball of black Colour 4 Me yarn, one ball of red Colour 4 Me yarn and one ball of Loopy Mohair yarn
Three-year-old - one ball of black Colour 4 Me yarn, one ball of red Colour 4 Me yarn and two balls of Loopy Mohair yarn
Four-year-old - one ball of black Colour 4 Me yarn, one ball of red Colour 4 Me yarn and two balls of Loopy Mohair yarn
Five-year-old - one ball of black Colour 4 Me yarn, one ball of red Colour 4 Me yarn and two balls of Loopy Mohair yarn.
Tip
Use only the yarns specified as other yarns may give unsatisfactory results. Quantities are approximate as they can vary between knitters.
Tip
Test the tension. Work 21 stitches and 38 rows to 10cm over moss st, using the 4.00mm needles and the 8 ply yarn. To work the tension square, use the 4.00mm needles and 8 ply yarn and cast on 31 stitches. Work 56 rows of moss st as for the back of the cardigan (as shown in issue 6). Cast off loosely. If the piece is larger or the stitches appear very loose, use smaller needles. If the piece is smaller, use larger needles.
Knitting abbreviations and symbols
* alt = alternate
* approx = approximately
* beg = beginning
* cm = centimetres
* cont = continue
* dec = decrease, decreasing
* foll = following
* garter st = knit every row
* inc = increase, increasing
* incl = inclusive, including
* K = knit
* moss st = knit 1, purl 1, repeat to last st, knit 1
* P = purl
* patt = pattern
* psso = pass slipped stitch/es over
* rem = remain, remaining
* rep = repeat
* sl = slip stitch
* st/s = stitch/es
* stocking st = stocking stitch - 1 row knit, 1 row purl
* tog = together
* indicates a repeat of the instructions following the asterisk as many times as indicated in the pattern.
Method
1. Using the 5.50mm needles and the Loopy Mohair yarn, loosely cast on 58 ( 62 -62- 66 -66- 66 ) sts. Work in stocking st until the work measures 6 ( 8 -8- 10 -10- 10 ) cm from the beg, ending with a knit row.
2. For the next row, P11, inc once in each of next 35 ( 39 -39- 43 -43- 43 ) sts, P12 ... there are now 93 ( 101 -101- 109 -109- 109 ) sts.
3. Change to the 4.00mm needles and beg the patt using the black Colour 4 Me yarn.
4. To work the first row, K1, * P1, K1, rep from * to end (moss st).
5. To work the second row, repeat step 4.
6. Change to the red Colour 4 Me yarn. To work the third row, repeat step 4. To work the fourth row, repeat step 4. (The last four rows form moss st.)
5. Cont patt until the work measures 10 ( 11 -11- 13 -13- 13 ) cm from the needle change, working last row on wrong side.
6. Shape the crown. For the 1 st row, moss 5, * sl 1, work 2tog, psso, moss 5, rep from * to end ... 71 ( 77 -77- 83 -83- 83 ) sts. Work 3 rows of the patt.
7. For the 5 th row, moss 5, * sl 1, work 2tog, psso, moss 3, rep from * to end ... there are now 49 ( 53 -53- 57 -57- 57 ) sts. Work 1 ( 3 -3- 3 -3- 3 ) row/s of the patt.
8. For the next row, moss 5, * sl 1, work 2tog, psso, moss 1, rep from * to end ... there are now 27 ( 29 -29- 31 -31- 31 ) sts. Work 1 row of the patt.
9. For the next row, moss 0 ( 2 -2- 1 -1- 1 ), * sl 1, work 2tog, psso, rep from * to end ... there are now 9 ( 11 -11- 11 -11- 11 ) sts. Work 1 row.
10. Break off the yarn and insert the end through the rem sts. Draw the yarn up tightly and fasten off securely. Do not press.
11. Using a back stitch, wool needle and the Colour 4 Me yarn, Stitch the back seam of the beanie. Reverse the stitching on the bottom half of the brim (Loopy Mohair yarn) so the stitching is on the front of the beanie. Sew in all the ends.
12. Fold the base of the brim up to the base of the Colour 4 Me stitching and secure with a single stitch at the seam.
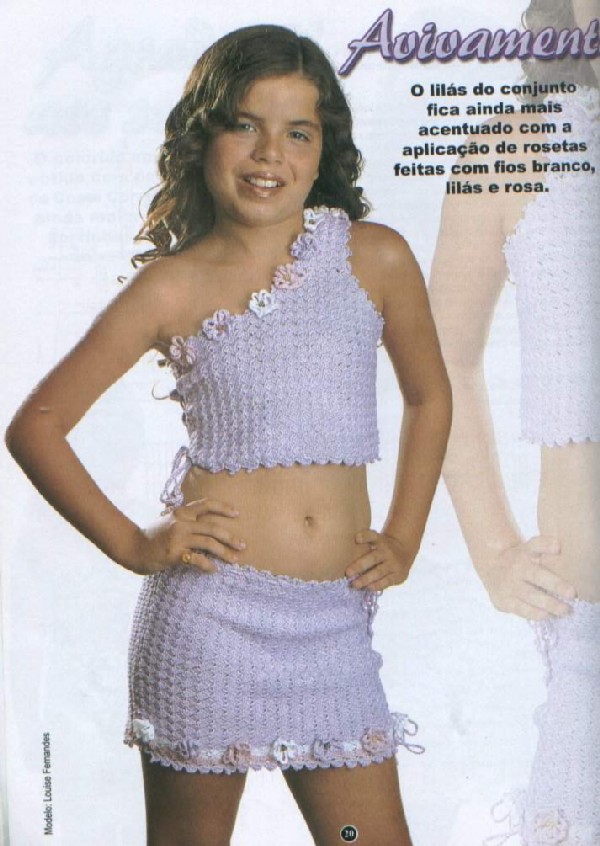
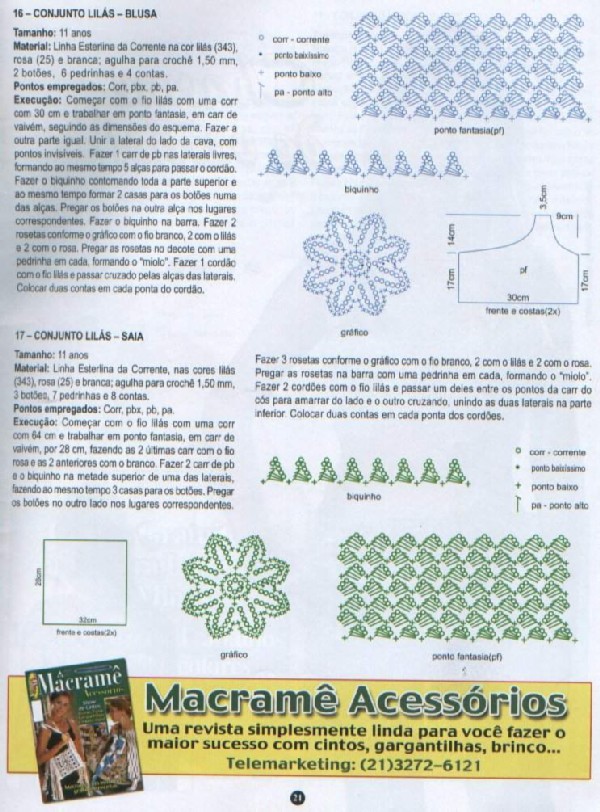
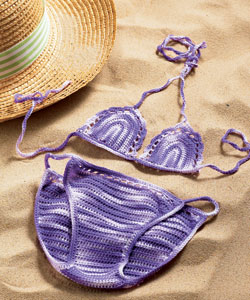
Flower child bikini
By Melinda Thomas
Follow these instructions to crochet a charming bikini to match the Flower child headscarf featured in i can make it myself issue three.
You will need...
Pellicano Crochet Cotton: 1x 50g ball white (7901)
Pellicano Crochet Cotton: 1x 50g ball pink (0702) for the small or 2 x 50g balls pink (0702) for the medium and large sizes
Semco: 2mm crochet hook
Duet sewing thread: white (4000)
2mm wide white hat elastic: 2m
Tapestry needle
Hand-stitching needle
General sewing supplies
Dimensions: This garment can be made in three different sizes.
Bikini top
Small - 9.5cm x 10.5cm
Medium - 10cm x 11.5cm
Large - 11cm x 12.5cm
Bikini bottom
Small - fits waist 46cm to 52cm
Medium - fits waist 52cm to 60cm
Large - fits waist 60cm to 70cm
Crochet abbreviations and symbols
approx = approximately
beg = beginning
ch = chain
cl = cluster
cm = centimetre
dc = double crochet
dtr = double treble
htr = half treble
mm = millimetre
rep = repeat
rnd = round
sl st = slip stitch
sp = space
tog = together
tr = treble
[] or () indicates a repeat of whatever is inside the parentheses as many times as indicated in the pattern.
* indicates a repeat of the instructions following the asterisk as many times as indicated in the pattern.
Tip
Throughout these instructions, a number of rows are repeated. Always check to make sure you follow the instructions that correspond to the size of the bikini you are making.
Tip
Test the tension. Make one flower following the instructions below. The flower should measure approximately 3cm in diameter (measuring from the edge of one petal to the edge of the adjacent petal). Check the tension before beginning and adjust the hook size to achieve the correct tension for this pattern. If the piece is larger than this, use a smaller hook. If the piece is smaller, use a slightly larger hook.
Method
Beg by making the two bikini top triangles. Using the white crochet cotton, make 6ch and join with sl st to form a ring.
Rnd 1: 1ch, 11dc in ring, sl st into 1ch at beg of rnd. Finish off.
Rnd 2: Join the pink thread to a dc from the previous row. 5ch, miss dc, (dc in next dc, 4ch, miss dc) 5 times, sl st in 1 st of 5ch at beg of rnd.
Rnd 3: sl st in 1 st sp, (1ch, htr, 3tr, htr, dc) in same sp, miss dc, *(dc, htr, 3tr, htr, dc) in next sp, miss dc, (repeat from * to end), sl st in back of flower between first and last petals. Finish off.
Rnd 4: Make the white edging around the flower. With right side of the flower facing you, join the white thread to the 2 nd of 3tr on a flower, 8ch, dtr in 2 nd of 3tr of next petal, 4ch, dtr in same st, 7ch, dc in 2 nd of 3tr of next petal, *7ch, (dtr 4ch, dtr) in 2 nd of 3tr on next petal, 7ch, dc in 2 nd of 3tr of next petal, (repeat from * once more, omitting the final dc in the last repeat), end with sl st in 1 st of 8ch from beg of rnd. Finish off.
Now, make the coloured section of the triangle.
Row 1: (All sizes) With right side of the flower motif facing you, join the pink thread to one of the white 4ch corner spaces of the previous row. Work 2ch, 2htr in same sp, htr in next dtr, 8htr in next sp, htr in next dc, 8htr in next sp, htr in next dtr, 3htr in next 4ch corner sp. Turn work at the end of the row.
Rows 2, 3 and 4: (All sizes) 2ch, htr in next 23htr to end, htr in 2 nd of 2ch from beg of previous row.
Row 5: (All sizes) 2ch, htr in same st, htr in next 23htr, 2htr in 2 nd of 2ch from beg of previous row.
Rows 6, 7 and 8: (All sizes) 2ch, htr in next 25htr, htr in 2 nd of 2ch from beg of previous row.
Row 9: (All sizes) 2ch, htr in same st, htr in next 25htr, 2htr in 2 nd of 2ch from beg of previous row.
Row 10: (All sizes) 2ch, htr in next 27htr, htr in 2 nd of 2ch from beg of previous row. Finish off for the small size only.
Row 11: (Medium and large) Rep row 10.
Row 12: (Medium only) 2ch, htr in next 27htr, htr in 2 nd of 2ch from beg of previous row. (Large only) 2ch, htr in same st, htr in next 27htr, 2htr in 2 nd of 2ch from beg of previous row.
Row 13: (Medium only), 2ch, htr in same st, htr in next 27htr, 2htr in 2 nd of 2ch from beg of previous row. Finish off the medium size only. (Large only) 2ch, htr in next 29htr, htr in 2 nd of 2ch from beg of previous row.
Row 14: (Large only) Rep row 13.
Row 15: (Large only) 2ch, htr in same st, 2htr in next 29htr, 2htr in 2 nd of 2ch from beg of previous row. Finish off the large size.
To make the white edging around the triangles, begin by positioning the triangle right side down and pointing to you. Join the white thread to the top right corner of one of the triangles.
Make 1ch. Crochet a row of dc evenly up the side of the triangle. In the top 4ch sp work (2dc, 2ch, 2dc). Continue working a row of dc down the other side of the triangle, then turn work (do not work across the base of the triangle). Make one more row of dc up the side of the triangle. In the top corner 2ch sp work (dc, 3ch, dc). Continue working a row of dc down the other side of the triangle (do not work across the base of the triangle). Finish off and repeat for the second triangle.
To make the bikini top straps for around the neck, position the triangle right side up and pointing to you. Join the white thread to the 3ch sp at the top of one of the bikini triangles.
Work 140 (140- 170 ) ch. Now, dc in 3 rd ch from hook, and dc each ch to end, sl st in the 3ch sp at the top sp of the bikini triangles. Weave in ends. Repeat to make the strap for the second bikini triangle.
Join the bikini triangles using the white thread. Position the triangles right side up and pointing to you. Work one row of dc along the base of the two bikini triangles, working no chain stitches between the two bikini triangles for the small and medium sizes and working 3ch between the bikini triangles for the large size as shown in Diagram 1.
Diagram 1
To make the strap to go around the base of the bikini top, work 360 (360- 420 ) ch. Fold this length of chain in half and thread another coloured thread through the centre of the row of ch to mark the centre, then unfold again.
Work dc in 3 rd ch from hook and into each ch until you reach approximately 15cm from the centre of the length of ch. Place the middle of the length of chain in the centre between the two bikini triangles (with the right side of the last row of edging facing you) and pin it in place. Lay the length of chain along the base of the bikini top with the triangles pointing towards you, and continue working dc along the length of ch stitches until you reach the corner of the first bikini triangle as shown in Diagram 2. The straps at the sides of the bikini top will be of equal length.
Diagram 2
Continue working a row of dc over the length of the chain and into the row of dc along the base of the bikini top triangles, encasing the length of chain in the dc stitches. For the small and medium sizes, work dc stitches into the dc along the base of the second triangle. For the large size, work dc stitches in each of the 3ch between the two triangles and continue working dc stitches along the base of the second triangle as shown in Diagram 3. Continue working dc stitches along the remainder of the length of ch until the end. Finish off and remove the pin.
Diagram 3
To make the front of the bikini bottoms, beg with 56 (71- 83 ) ch.
Row 1: (All sizes) Working back along the length of the chain just made, tr in 8 th ch from hook, *2ch, miss 2ch, tr in next ch, (repeat from * to end), turning the work at the end of each row.
Row 2: (All sizes) 2ch, *2htr in sp, htr in next tr, (repeat from * to end), 3htr in last sp.
Row 3: (All sizes) 2ch, make next 2htr tog in a cl, htr in each htr to the last 2htr, (make a 3htr cl by working the last 2htr and htr in 2 nd of 2ch tog in a cl).
When decreasing the amount of htr stitches in a row, some htr stitches will be worked together in a cl. To make a 2htr cl, wrap the thread over the hook, insert the hook through the stitch, then wrap the thread over hook again and draw the hook and thread back through the stitch. Wrap the thread over the hook, insert the hook through the next stitch, then wrap the thread over the hook and draw the hook and thread back through this stitch. Wrap the thread over the hook and draw the thread back through all five loops on the hook.
To make a 3htr cl, wrap the thread over the hook, insert the hook through the stitch, wrap the thread over the hook and draw the hook and thread back through this stitch. Wrap the thread over the hook, insert the hook through the next stitch, wrap the thread over the hook and draw the hook and thread back through this stitch. Wrap the thread over the hook, insert the hook through the next stitch, wrap the thread over the hook and draw the hook and thread back through this stitch. Wrap the thread over the hook and draw the thread back through all seven loops on the hook.
Row 4: (All sizes) 1ch, htr in each htr to the last htr, (make a 2htr cl by working the last htr and htr in cl from beg of previous row tog), miss 2ch from beg of previous row. This row will contain 1ch, 45htr and a 2htr cl for the small size, 1ch, 60htr and a 2htr cl for the medium size and 1ch and 72htr and 2htr cl for the large size.
Tip
When repeating rows from this point onwards for the front of the bikini pants, you will notice the number of stitches in each row decrease. This is how the pants are shaped.
Row 5: (All sizes) 2ch, make next 2htr together as a cl, htr in each htr to the last 3htr, make a 3htr cl, miss 1ch from beg of previous row.
Row 6: (All sizes) Rep row 4.
Row 7: (All sizes) Rep row 5.
Row 8: (All sizes) Rep row 4. This row will contain 1ch, 33htr and 2htr cl for the small size, 1ch, 48htr and 2htr cl for the medium size, and 1ch, 60htr and 2htr cl for the large size.
Row 9: (Small only) 1ch, htr in each htr to last 2htr, make a 2htr cl by working the last 2htr tog in a cl, miss 1ch at end of row. (Medium and large) Rep row 5.
Row 10: (Small only) Rep row 9. (Medium and large) Rep row 4.
Row 11: (Small and medium) 1ch, htr in each htr to last 2htr, make a 2htr cl by working the last 2htr tog in a cl, miss 1ch at end of row. (Large only) Rep row 5.
Row 12: (Small and medium) Rep row 11. (Large only) Rep row 4.
Rows 13, 14 and 15: (All sizes) 1ch, htr in each htr to last 2htr, make a 2htr cl by working the last 2htr tog in a cl, miss 1ch at end of row.
Row 16: (Small only) 2ch, htr in each htr to end, miss 1ch at end of row. (Medium and large) Rep row 13.
Row 17: (Small only) 1ch, htr to last htr, (make a 2htr cl by working the last htr and htr in 2 nd of 2ch tog in a cl). (Medium and large) Rep row 13.
Row 18: (Small only) Rep row 16. (Medium and large) Rep row 13.
Row 19: (Small only) Rep row 17. (Medium only) 2ch, htr in each htr to end, miss 1ch at end of row. (Large only) Rep row 13.
Row 20: (Small only) Rep row 16. (Medium only) 1ch, htr in each htr to the last htr, make 2htr cl by working the next htr and htr in 2 nd of 2ch tog. (Large only) Rep row 13.
Row 21: (Small only) 2ch, htr in each htr to end, htr in 2 nd of 2ch from beg of previous row. (Medium only) 2ch, htr in each htr to end, miss 1ch at end of row. (Large only) Rep row 13.
Row 22: (Small only) Rep row 21. (Medium only) 1ch, htr in each htr to last htr, make a 2htr cl by working the next htr and htr in 2 nd of 2ch tog in a cl. (Large only) Rep row 13.
Row 23: (Small only) Rep row 21. (Medium only) 2ch, htr in each htr to end, miss 1ch at end of row. (Large only) Rep row 13.
Row 24: (Small only) Rep row 21. (Medium only) Rep row 22. (Large only) Rep row 13.
Row 25: (Small only) Rep row 21. (Medium and large) 2ch, htr in each htr to end, miss 1ch from beg of previous row.
Row 26: (Small and large) 2ch, htr in each htr to end, htr in 2 nd of 2ch from beg of previous row. (Medium only) Rep row 22.
Row 27: (Small only) Rep row 21. (Medium only) 2ch, htr in each htr to end, miss 1ch at end of row. (Large only), 1ch, htr in each htr to last htr, make a 2htr cl by working the last htr and htr in 2 nd of 2ch tog in a cl.
Row 28: (Small and medium) 2ch, htr in each htr to end, htr in 2 nd of 2ch from beg of previous row. (Large only) Rep row 25.
Rows 29 and 30: (all sizes) 2ch, htr in each htr to end, htr in 2 nd of 2ch from beg of previous row. Row 29 will contain 2ch and 15htr for the small size, 2ch and 18htr for the medium size and 2ch and 22htr for the large size.
Row 31: (Small and medium) Rep row 28. (Large only) Rep row 27.
Row 32: (Small and medium) Rep row 28. (Large only) Rep row 25.
Row 33: (Small only) 2ch, htr in same st, htr in each htr to end, 2htr in 2 nd of 2ch at end of row. (Medium and large) 2ch, htr in each htr to end, htr in 2 nd of 2ch from beg of previous row.
Row 34: (Small only) Rep row 28 and finish off.
Rows 34, 35 and 36: (Medium and large) Rep row 33.
Rows 37: (Medium only) 2ch, htr in same st, htr in each htr to end, 2htr in 2 nd of 2ch at end of row. (Large only) Rep row 33.
Row 38: (Medium and large) Rep row 33.
Row 39: (Medium only) 2ch, htr in same st, htr in each htr to end, 2htr in 2 nd of 2ch at end of row. For the medium size there will be 2ch and 22htr in this row. Finish off. (Large only) Rep row 33.
Row 40: (Large only) Rep row 33.
Row 41: (Large only) 2ch, htr in same st, htr in each htr, 2htr in 2nd of 2ch from beg of previous row.
Rows 42 and 43: (Large only) Rep row 33.
Row 44: (Large only) Rep row 41.
Row 45: (Large only) Rep row 33. Finish off.
To make the back of the pants, use the pink thread and beg with 74 (92- 104 ) ch.
Row 1: (All sizes) Working back along length of chain just made, tr in 8 th ch from hook, *2ch, miss 2ch, tr in next ch, (repeat from * to end of row). Turn work at the end of the row.
Row 2: (All sizes) 2ch, *2htr in sp, htr in next tr, (rep from * to end), 3htr in last sp.
Row 3: (All sizes) 2ch, make next 2htr tog as a cl, htr in each htr to the last 2htr, (make a 3htr cl by working the next 2htr and htr in 2 nd of 2ch tog as a cl).
Row 4: (All sizes) 1ch, htr in each htr to last htr, (make a 2htr cl by working the next htr and htr in cl from beg of previous row tog as a cl), miss 2ch.
Row 5: (All sizes) 1ch, htr in each htr to last 2htr, make a 2htr cl by working the last 2htr tog in a cl, miss 1ch at end of row.
Row 6: (Small only) rep row 5. (Medium and large) 2ch, make next 2htr tog as a cl, htr in each htr to the last 3htr, make a 3htr cl, miss 1ch from beg of previous row.
Row 7: (Small only) Rep row 5. (Medium and large) Rep row 4.
Row 8: (Small only) 2ch, htr in each htr to end, miss 1ch from beg of previous row. (Medium and large) Rep row 5.
Row 9: (Small only) 1ch, htr in each htr to last htr, (make a 2htr cl by working the next htr and htr in 2 nd of 2ch tog in a cl). (Medium and large) Rep row 5.
Row 10: (All sizes) 2ch, htr in each htr to end, miss 1ch from beg of previous row. This row will contain 2ch and 55htr for the small size, 2ch and 69htr for the medium size and 2ch and 81htr for the large size.
Row 11: (All sizes) 1ch, htr in each htr to last htr, (make a 2htr cl by working the next htr and htr in 2 nd of 2ch tog). Tip When repeating rows from this point onwards for the back of the bikini bottoms, you will notice the number of stitches in each row decrease. This is how the pants are shaped.
Row 12: (Small only) Rep row 8. (Medium and large) Rep row 5.
Row 13: (Small only) Rep row 11. (Medium and large) Rep row 10.
Row 14: (Small only) Rep row 8. (Medium and large) Rep row 11.
Row 15: (Small only) Rep row 11. (Medium and large) Rep row 5.
Row 16: (All sizes) 2ch, htr in each htr to end, miss 1ch from beg of previous row. This row will contain 2ch and 49htr for the small size, 2ch and 61htr for the medium size and 2ch and 73htr for the large size.
Row 17: (All sizes) Rep row 11.
Row 18: (Small only) 2ch, htr in each htr to end, miss 1ch at end of row. (Medium and large) Rep row 5.
Row 19: (Small only) Rep row 11. (Medium and large) Rep row 5.
Row 20: (All sizes) Rep row 16.
Row 21: (All sizes) Rep row 11.
Rows 22 and 23: (All sizes) Rep row 5.
Rows 24: (Small only) Rep row 5. (Medium and large) Rep row 16.
Row 25: (Small only) Rep row 5. (Medium and large) Rep row 11.
Rows 26 and 27: (All sizes) Rep row 5.
Row 28: (Small only) Rep row 5. (Medium and large) Rep row 16.
Row 29: (Small only) Rep row 5. (Medium and large) Rep row 11.
Rows 30, 31, 32, 33 and 34: (All sizes) Rep row 5. After completing row 34, finish off the small size only.
Rows 35, 36, 37 and 38: (Medium and large) Rep row 5.
Row 39: (Medium only) 2ch, htr in each htr to the last 2htr, work last 2htr tog as a cl. Finish off the medium size only. Row 39: (Large only) Rep row 5.
Rows 40, 41, 42 and 43: (Large only) Rep row 5.
Row 44: (Large only) 1ch, htr in each htr to end, miss 1ch at end of row.
Row 45: (Large only) 2ch, htr in each htr to end, miss ch at end of row. Finish off the large size. Assemble the pants and make the edgings. For the leg edgings, place the front and back pieces together so the right side of first row on each piece face each other. Using the pink thread, hand-stitching needle and a whip stitch, sew the crotch seam.
Cut two, 39 (46- 56 ) cm pieces of elastic for the leg edgings. Overlap the ends of one piece by 3cm and stitch with the white sewing thread and hand-stitching needle to firmly bind the ends together. Repeat for the second piece of elastic.
With the right sides of the first row of the pants together, join the white thread to the top right corner of the leg edge and make1ch. Make a row of dc along the edge. Turn the work at the end of the row. Holding the elastic circle up against the leg edge, make 1ch and then work back along the dc just made, crocheting dc stitches over the circle of elastic to encase it in the leg edging.
Finish off and rep for the other leg edge. (The exposed elastic on the sides of the pants will be encased in dc stitches in the final row of the waist edging.)
To make the waist edgings, cut one, 44 (54- 64 ) cm piece of elastic. Overlap the ends of one piece by 3cm and stitch with the white sewing thread to firmly bind the ends.
With the right side of the pants facing outwards, join the white thread to the top right corner on the back of the pants and make 1ch. Make a row of dc along back of pants working a dc in each htr and 2dc in each sp. To make the strip at the sides of the bikini pants work 24 (28- 32 ) ch.
Tip
Reduce the length of the chain at the side of the bikini bottoms to make the pants smaller. Conversely, enlarge them by increasing the length of the chain.
Continue working a row of dc along the top of the front of the pants and work 24 (28- 32 ) ch at the other side of the bikini pants. Finish off the row with sl st in 1ch at beg of row.
Holding the elastic circle up against the waist edge, make 1ch and then work 1dc into each dc of the previous row, crocheting the dc stitches over the circle of elastic to encase it in the waist edging. Crochet in this way along the back of the pants, and continue crocheting dc stitches across the sides of the pants, making 1dc into each ch at the side of the pants, crocheting over the elastic from the waist and the top of the leg as you go. Continue crocheting dc stitches along the front of the pants, encasing the elastic as you go. Work dc stitches into the ch stitch on the other side strip, working over both pieces of the elastic to encase it in the dc stitch. Finish off.
Make two flowers. Using the white thread, make 6ch and join with a sl st to form a ring.
Rnd 1: 1ch, 11dc in ring, sl st into 1ch at beg of rnd. Finish off.
Rnd 2: Join the pink thread to a dc from the previous row. 5ch, miss dc, (dc in next dc, 4ch, miss dc) 5 times, sl st in 1 st of 5ch at beg of rnd.
Rnd 3: sl st in 1 st sp, (1ch, htr, 3tr, htr, dc) in same sp, miss dc, *(dc, htr, 3tr, htr, dc) in next sp, miss dc, (repeat from * to end), sl st in back of flower between first and last petals. Finish off.
Stitch one flower to the top left and right corners at the front of the pants front using the white sewing thread and hand-stitching needle.
Variegated Bikinis
By Melinda Thoms
If you were inspired by the Flower child crochet bikini in issue three of i can make it myself, try this variegated version to add to your child's wardrobe.
You will need...
Pellicano Crochet Cotton: variegated purple (5555) 2 x 50g balls
Semco: 2mm crochet hook
Duet sewing thread: white (4000)
2mm white hat elastic: 60cm
Tapestry needle
Hand-stitching needle
General sewing supplies
Dimensions: This garment can be made in three different sizes.
Bikini top
Small - 8cm x 8.5cm
Medium - 9.5cm x 10cm
Large - 12cm x 11cm
Bikini bottom
Small - fits waist 46cm to 52cm
Medium - fits waist 52cm to 60cm
Large - fits waist 60cm to 70 cm
Crochet abbreviations and symbols
beg = beginning
ch = chain
cm = centimetre
dc = double crochet
dtr = double treble
htr = half treble
ie = that is m = metre
rep = repeat
sl st = slip stitch
sp = space
st/s = stitch/es
tr = treble
[] or () indicates a repeat of whatever is inside the parentheses as many times as indicated in the pattern.
* indicates a repeat of the instructions following the asterisk as many times as indicated in the pattern.
Tip
Test the tension. The first four rows of the bikini triangle should measure 3cm along the base and be 4.5cm high. Check the tension before beginning and adjust the hook size to achieve the correct tension for this pattern. If the piece is larger than this, use a smaller hook. If the piece is smaller, use a slightly larger hook.
Method
To make the triangles for the bikini top, beg with 12ch and turn the work after each row.
Row 1: (All sizes) htr in 4 th ch from hook, htr in next 7ch, 5htr in end ch, working down other side of this row, htr in the base of the chain sts the previous tr were worked in, htr in ch at end of row, miss 2ch.
Row 2: (All sizes) 2ch, htr in next 9htr, 2htr in next htr, 3htr in next htr, 2htr in next htr, htr in next 9htr, htr in 2 nd of 2ch at end.
Row 3: (All sizes) 2ch, htr in next 11htr, 2htr in next htr, 3htr in next htr, 2htr in next htr, htr in next 11htr, htr in 2 nd of 2ch at end.
Row 4: (All sizes) 2ch, htr in next 10htr, (2htr in next htr, htr in next htr) twice, 3htr in next htr, (htr in next htr, 2htr in next htr) twice, htr in next 10htr, htr in 2 nd of 2ch at end.
Row 5: (Small only) 2ch, htr in next 13htr, 2tr in next htr, tr in next 3htr, 3tr in next htr, tr in next 3htr, 2tr in next htr, htr in next 13htr, htr in 2 nd of 2ch at end of row.
(Medium and large ) 2ch, htr in next 13htr, 2htr in next htr, htr in next 3htr, 3htr in next htr, htr in next 3htr, 2htr in next htr, htr in next 13htr, htr in 2 nd of 2ch at end.
Row 6: (Small only) 2ch, htr in next 7htr, (2htr in next htr, htr in next 2htr) twice, (2htr in next tr, htr in next 2tr) twice, 3htr in next tr, (htr in next 2tr, 2htr in next tr) twice, (htr in next 2htr, 2htr in next htr) twice, htr in next 7htr, htr in 2 nd of 2ch. Then c ommence edging the rows following the instructions below.
(Medium and large) 2ch, htr in next 14htr, 2htr in next htr, htr in next htr, 2tr in next htr, tr in next 2htr, 3dtr in next htr, tr in next 2htr, 2tr in next htr, htr in next htr, 2htr in next htr, htr in next 14htr, htr in 2 nd of 2ch at end.
Row 7: (Medium and large) 2ch, htr in next 17htr, htr in tr, 2htr in next tr, htr in next tr, 2htr in htr, htr in next dtr, 3htr in next dtr, htr in dtr, 2htr in next tr, htr in tr, 2htr in next tr, htr in tr, htr in next 17htr, htr in 2 nd of 2ch at end.
Row 8: (Medium and large) 2ch, htr in next 19htr, (2htr in next htr, htr in next 2htr) twice, 3htr in next htr, (htr in next 2htr, 2htr in next htr) twice, htr in next 19htr, htr in 2 nd of 2ch at end.
Row 9: (Medium and large) 2ch, htr in next 17htr, 2htr in next htr, htr in next 10htr, 3htr in next htr, htr in next 10htr, 2htr in next htr, htr in next 17htr, 2htr in 2 nd of 2ch.
(Medium only) Commence edging rows following the instructions below.
Row 10: (Large only), 2ch, htr in next 15htr, 2htr in next htr, tr in next 4htr, 2tr in next htr, tr in next 4htr, 2tr in next htr, tr in next 4htr, 3tr in next htr, tr in next 4htr, 2tr in next htr, htr in next 4htr, 2htr in next htr, htr in next 4htr, 2htr in next htr, htr in next 15htr, htr in 2 nd of 2ch at end.
Row 11: (Large only), 2ch, htr in next 12htr, 2htr in next htr, htr in next 10htr, htr in next 11tr, 3tr in next tr, htr in next 11tr, htr in next 10htr, 2htr in next htr, htr in next 12htr, htr in 2 nd of 2ch at end. Commence edgings.
Edge the rows of the bikini top triangles.
Row 1: (All sizes) 2ch, htr in next htr, (2ch, miss 3htr, htr in next htr) 7 (9- 11 ) times, 2ch, miss 3htr, 3htr in next htr, (2ch, miss 3htr, htr in next htr) 7 (9- 11 ) times, 2ch, miss 2htr, htr in next htr, htr in 2 nd of 2ch at end.
Row 2: (All sizes) 3ch, tr in next htr, (tr, htr, dc) in sp, [(dc, htr, tr) in next sp, tr in htr, (tr, htr, dc) in next sp] 3 (4- 5 ) times, (dc, htr, tr) in next sp, tr in next tr, (tr, 3ch, tr) in next tr, tr in tr, (tr, htr, dc) in next sp, [(dc, htr, tr) in next sp, tr in htr, (tr, htr, dc) in next sp] 3 (4- 5 ) times, (dc, htr, tr) in next sp, tr in htr, tr in 2 nd of 2ch at end of row. Finish off then rep to make the second triangle for the bikini top.
Now, make the bikini top straps. Join thread to the 3ch sp at the top of one of the bikini triangles, with the right side of the last row of the edging facing you.
Work 120 (140- 180 ) ch. dc in 3 rd ch from hook, and into each ch to end. Sl st in the 3ch sp at the top of the bikini triangles. Weave in the ends. Repeat to make the strap for the other bikini triangle.
To join the bikini triangles, work one row of dc along the base of the two bikini triangles, ensuring that the right side of the last row of edging on the triangles is facing you and working 2 (4- 4 ) ch between the two bikini triangles. Finish off.
Make the strap to go around the chest and base of the bikini top. Make 320 (380- 420 ) ch. Fold this length of chain in half and thread another coloured thread through the centre of the row of ch to mark the centre, then unfold again.
Work dc in 3 rd ch from hook and into each ch until you reach approximately 15cm from the centre of the length of ch. Place the middle of the length of chain in the centre between the two bikini triangles (with the right side of the last row of edging facing you) and temporarily pin it in place. Lay the length of chain along the base of the bikini top with the triangles of the bikini top pointing towards you, and continue working dc along the length of ch stitches until you reach the corner of the first bikini triangle. The straps at the sides of the bikini top will be of equal length.
Continue crocheting, working a row of dc over the length of chain and into the row of dc along the base of the bikini top triangles, encasing the length of chain in the dc stitches. For the small size only, work dc in the 2ch between the triangles. For the medium and large sizes work dc stitches in the 4ch between the two triangles. Continue crocheting dc stitches into the dc along the base of the second triangle. dc along the remainder of the length of ch until end. Finish off and remove the pin.
Make the front of the pants.
Row 1: (All sizes) 19 (21- 23) ch, htr in 3 rd ch from hook, htr in each ch to end.
Row 2: (All sizes) 2ch, htr in each htr to end, miss 2ch at end.
Row 3: (All sizes) 2ch, htr in each htr to end, miss 2ch at end.
Row 4: (All sizes) 2ch, htr in next 14 (16- 18) htr in 2 nd of 2ch at end. Repeat 8 (10- 12) more times.
To shape the legs, for the next row work 2ch, htr in same st, htr in next 14 (16- 18) htr, 2htr in 2 nd of 2ch at end. This will increase the row at either end.
Next row: (All sizes) 2ch, htr in each htr to end, htr in 2 nd of 2ch at end. (Repeat row once more.)
Next rows: (All sizes) Work consecutive rows increasing at either end of each row ie. (2ch, htr in same st, htr in each htr to end, 2htr in 2 nd of 2ch at end) until last row which should have the 2ch from the start of the row and 47 (59- 65) htr.
Next row: (All sizes) 2ch, htr in same st, htr in next htr, (2ch, miss 3htr, htr in next htr) 13 (17- 19) times, 2ch, miss 3htr, htr in next htr, 2htr in 2 nd of 2ch at end. There should be 34 (41- 45) rows. Finish off.
Make the back of the pants.
Row 1: (All sizes) 19 (21- 23) ch, htr in 3 rd ch from hook, htr in each ch to end.
Row 2: (All sizes) 2ch, htr in same st, htr in each htr to end, 2htr in 2 nd of 2ch at end.
Row 3: (All sizes) 2ch, htr in same st, htr in next 19 (21- 23) htr, 2htr in 2 nd of 2ch at end.
Row 4: (All sizes) 2ch, htr in same st, htr in each htr to end, 2htr in 2 nd of 2ch.
Row 5: (Small only) rep row 4, 10 times so there are 2ch and 43htr in the last row.
(Medium only) rep row 4, 13 times so there are 2ch and 46htr in the last row.
(Large only) rep row 4, 19 times so there are 2ch and 60htr in the last row.
Next Row: (All sizes) 2ch, htr in each htr to end, htr in 2 nd of 2ch at end.
Next Row: (All sizes) 2ch, htr in same st, htr in each htr to end, 2htr in 2 nd of 2ch.
Repeat the last two rows 8 (11- 10) times, so there are 2ch and 61htr for the small size, 2ch and 69htr for the medium size and 2ch and 81htr for the large size.
Next Row: (Small only) 2ch, htr in same st, htr in each htr to end, 2htr in 2 nd of 2ch at end.
(Medium and large) 2ch, htr in each htr to end, htr in 2 nd of 2ch. (Repeat this row once more.)
Next Row: (All sizes) 2ch, htr in same st, (2ch, miss 3htr, htr in next htr) 19 (21- 25) times, 2ch, miss 2htr, 2htr in 2 nd of 2ch.
Assemble the pants and make the edgings. For the leg edgings, place the front and back pieces together so the right side of the last row on each piece face each other. Using the thread, hand-stitching needle and a whip stitch, s ew the crutch seam.
Cut two, 39 (44- 54) cm pieces of elastic. Overlap the ends of one piece by 3cm and stitch with the white sewing thread and hand-stitching needle. Repeat for the second piece of elastic.
With right side of pants facing you, join the thread to top right corner of back of pants. Make 1ch. Work a row of dc along the leg edge. Turn work at the end of the row. Holding the elastic circle against the leg edge, make 1ch and then work back along the dc just made, crocheting dc stitches over the elastic to encase it in the leg edging.
Finish off and repeat for the other leg edge. (The exposed elastic on the sides of the pants will be encased in dc stitches in the final row of the waist edging.)
To make the waist edging, cut one 47 (53- 61) cm piece of elastic. Overlap the ends of one piece by 3cm and stitch with the white sewing thread and hand-stitching needle. With right side of pants facing you, join the thread to the top right corner of the back of the pants.
Make 1ch, then work a row of dc along the back of the pants working a dc in each htr and 2dc in each sp. To make the strip at the sides of the bikini pants, work 24 (28- 32) ch.
Tip
Reduce the length of the chain at the side of the bikini bottoms to make the pants smaller. Conversely, enlarge them by increasing the length of the chain.
Continue working a row of dc along the top of front of pants and work 24 (28- 32) ch at the other side before finishing off the row with sl st in 1ch at beg of row.
Holding the elastic circle up against the waist edge, make 1ch and then work 1dc into each dc of the previous row, crocheting dc stitches over the circle of elastic to encase it in the waist edging. Crochet in this way along the back of the pants and continue crocheting dc stitches across the sides of the pants, making 1dc into each ch at the side of the pants, crocheting over the elastic from the side of the waist and the top of the leg as you go. Continue crocheting dc stitches along the front of the pants, encasing the elastic as you go and finish off the other side strip as you did the first, with dc stitches into the ch stitches, working over the elastic to encase it in the dc stitch. Finish off.
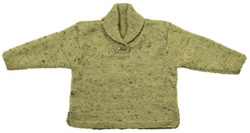
Green collared sweater
By Anette Eriksson
Dimensions:
This garment can be made in four different sizes:
Months (approx)
0
3
6
9
Fits underarm
cm
35
40
45
50
Garment measures
cm
45
52
57
65
Length (approx)
cm
22
25
28
32
Sleeve length (approx)
cm
11
13
16
19
You will need
Country Naturals 8 Ply 50g balls: four, green
One button
3.25mm (No 10) knitting needles
4.00mm (No 8) knitting needles
Wool needle
Four balls of yarn are needed when making this sweater for a baby aged three months or under. A sweater for a six- or nine-month-old baby will require five balls of yarn. Before purchase, check the ball bands to ensure all yarn is from the same dye lot.
Use only the yarn specified as other yarns may give unsatisfactory results.
Quantities are approximate, as results can vary between knitters.
Tip
Test the tension. This project has been designed at a tension of 22 stitches and 30 rows to 10cm over stocking stitch, using 4.00mm needles.
Knitting abbreviations and symbols
alt = alternate
beg = begin/ning
cm = centimetres
cont = continue
dec = decrease, decreasing
foll = follows, following
garter st = every row knit
inc = increase, increasing
incl = inclusive, including
K = knit
M1 = make 1 - pick up loop which lies before next st, place of left-hand needle and knit into back of loop
0 = zero - no sts, rows or times
P = purl
rem = remain/ing
rep = repeat
st/s = stitch/es
stocking st = 1 row knit, 1 row purl
tog = together
yfwd = yarn forward - bring yarn under needle, then over into knitting position again, making a stitch.
Method
To make the back, use the 4.00mm needles. Cast on 49 (57- 63 -71) sts.
Work 6 rows garter st.
To make the side splits, for row one, knit.
For row two, K4, purl to last 4 sts, K4.
Rep last two rows four times.
For the next row, cast on one st, knit to end.
For the next row, cast on one st, purl to end ... 51 (59-65-73) sts.
Cont in stocking st until work measures 12 (14-16-19) cm from beg, ending with a purl row.
To shape the armholes, cast off 2 sts at beg of next 2 rows ... 47 (55- 61 -69) sts.
Dec one st at each end of next and foll alt rows until 41 (49- 53 -59) sts rem.
Work 1 row.
Work 22 (26- 26 -28) rows stocking st.
To shape the shoulders, cast off 6 (7- 7 -9) sts at beg of next 2 rows, then 5 (7- 7 -8) sts at beg of foll 2 rows.
Cast off rem 19 (21- 25 -25) sts.
To make the front, work Steps 1-11 as for the back.
To shape the neck, K 16 (20- 22 -25) sts, cast off next 9 sts, K 16 (20- 22 -25) sts.
Cont on last 16 (20- 22 -25) sts for right side of neck, dec one st at neck edge in 2nd and foll 4th (4th- alt -alt) rows until 11 (14- 18 -22) sts rem.
At this point, for the six- and nine-month-old sizes only,
in foll 4th rows until ( 14 -17) sts rem.
Work 4 (4- 2 -2) rows.
To shape the shoulder, cast off 6 (7- 7 -9) sts at beg of next row.
Work 1 row.
Cast off rem 5 (7- 7 -8) sts.
With wrong side facing the knitter, join yarn to rem 16 (20- 22 -25) sts and purl to end.
Cont on these 16 (20- 22 -25) sts for left side of neck, dec one st at neck edge in next and foll 4th (4th- alt -alt) rows until 11 (14- 18 -22) sts rem.
At this point, for the six- and nine-month-old sizes only,
dec in foll 4th rows until ( 14 -17) sts
Work 3 (3- 1 -1) row/s.
Work as given for other shoulder shaping.
To make the sleeves, use the 3.25mm needles, cast on 27 (29- 29 -31) sts.
Work 6 rows garter st.
Change to 4.00mm needles.
Working in stocking st, inc one st at each end of next and foll alt row/s until there are 31 (37- 37 -35) sts, then in foll 4th rows until there are 41 (47- 51 -55) sts.
Cont without further inc until work measures 11 (13- 16 -19) cm from beg, ending with a purl row.
To shape the armhole, cast off 2 sts at beg of next 2 rows ... 37 (43- 47 -51) sts.
Dec one st at each end of next and foll alt rows until 31 (37- 39 -41) sts rem.
Work 1 row.
Cast off 6 (7- 8 -8) sts at beg of next 2 rows, then 5 (7- 7 -8) sts at beg of foll 2 rows.
Cast off rem 9 sts.
To make the collar, use the 3.25mm needles, cast on 10 sts.
Work 3 rows garter st (1st row is wrong side).
For row four, knit, inc one st at end of row ... 11 sts.
For row five, knit.
For row six, to make buttonhole, K5, yfwd K2tog, K 4 (3- 3 -3), (inc in next st) 0 (1- 1 -1) time/s ... 11 (12- 12 -12) sts.
Cont in garter st, inc one st at end of 2nd and foll 4th (4th- 4th -alt) rows until there are 19 (20- 21 -16) sts. At this point, for the nine-month-old size only, inc in foll 4th rows until there are 23 sts.
For all sizes, work 1 row.
For the next row, work on the right side K 12 (13- 15 -17), turn .
Tip
When turning, take the yarn under the needle and onto the other side of the work. Slip next st onto right-hand needle, take the yarn under the needle and back to the original position. Slip st back onto the left-hand needle, then turn and proceed as instructed. This avoids creating holes in the work.
For the next row, knit to end.
Knit 2 rows.
Rep last 4 rows (Steps 43-45) 18 (19- 21 -21) times.
Working in garter st, dec one st at end of next and foll 4th rows until 10 (12- 12 -15) sts rem. At this point, for the three-, six- and nine-month sizes only, dec in foll alt rows until 10 sts rem.
For all sizes, work 3 rows.
Cast off loosely knitways.
To join the pieces together and make the jumper, begin by joining the shoulder seams. Place the centre of the sleeves to the shoulder seams. Sew in the sleeves evenly.
Join the side and sleeve seams.
Slip stitch the ends of collar into position at centre front, with the buttonhole side on top.
Sew collar into position and fold collar onto the right side.
Sew the button to the piece directly under the buttonhole.
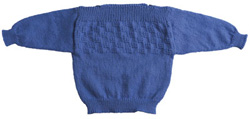
Blue baby sweater
By Linda Purdy
Dimensions
This garment is designed to be an easy fit. It can be made in four different sizes:
Months (approx)
0
3
6
12
Fits underarm
cm
35
40
45
50
Garment measures
cm
42
48
56
58
Length (approx)
cm
22
25
28
32
Sleeve length (approx)
cm
12
14
17
20
You will need
Shepherd Baby Wool 4 Ply 50g balls: two, blue
3.25mm (No 10) knitting needles
2.75mm (No 12) knitting needles
Contrasting coloured thread
Wool needle
Two, 15mm buttons
Two balls of yarn are needed when making this jumper for a baby aged six months or under. If making the jumper for a 12-month-old baby, three balls will be needed.
Tip
Shepherd Baby Wool 4 Ply may be substituted for Patons Dreamtime 4 Ply 25g balls. If so, twice as many balls will be needed.
Use only the yarns specified as other yarns may give unsatisfactory results. Quantities are approximate, as results can vary between knitters.
Tip
Before purchase, check the ball bands to ensure all yarn is from the same dye lot.
Tip
Test the tension. This garment has been designed at a tension of 28 stitches and 36 rows to 10 cm over stocking stitch, using 3.25mm needles. To make a 15cm x 15cm tension square, using 3.25mm needles, cast on 42 stitches, work 54 rows in stocking stitch and cast off loosely. Place a pin vertically into the fabric several stitches in from one side. Carefully measure 10cm from the pin and place another pin. Count the stitches between the pins and if you have less than 28 stitches use smaller needles, and more than 28 stitches use bigger needles.
Knitting abbreviations and symbols
alt = alternate
beg = beginning
cm = centimetres
cont = continue
dec = decrease, decreasing
inc = increase, increasing
incl = inclusive, including
M1 = Make 1 - pick up the loop which lies before the next stitch, place it on the left-hand needle and knit (or purl) into the back of loop
K = knit
P = purl
patt = pattern
rem = remain, remaining
rep = repeat
P2C = Purl 2, keeping yarn in front of work - slip these 2 sts onto the left-hand needle, take the yarn across the front of these 2 sts then to back of work, slip these 2 sts back onto the right-hand needle.
st/s = stitch/es
stocking st = stocking stitch - 1 row knit, 1 row purl
tog = together.
() indicates the number of stitches required for the different sizes
The first row worked is always the right side, unless otherwise stated.
Method
To make the back, use the 2.75mm needles. Cast on 63 ( 71 -79- 85 ) sts.
For the first row, K2, * P1, K1, rep from * to last st, K1.
For the second row, K1, * P1, K1, rep from * to end.
Rep first and second rows 5 ( 6 -6- 7 ) times ... 12 ( 14 -14- 16 ) rows rib in total.
Change to 3.25mm needles.
Work in stocking st until work measures 10 ( 12 -14- 17 ) cm from beg, ending with a purl row and inc ( dec -inc- inc ) 5 ( 3 -1- 7 ) st/s evenly across last row ... 68 ( 68 -80- 92 ) sts.
Tie a contrasting coloured thread at each end of the last row to mark beg of armholes as there is no armhole shaping.
Beg patt for: First, third and fifth rows: K7, * (P2C) 3 times, K6, rep from * to last st, K1. Second and alt rows: Purl. Seventh, ninth and eleventh rows: K1, (P2C) 3times, * K6, (P2C) 3 times, rep from * to last st, K1. Twelfth row: Purl. Rows 1 to 12 incl form pattern.
Cont in patt until work measures approx 17 ( 20 -23- 27 ) cm from beg, ending with a 5th or 11th row.
For the next row, purl, evenly dec ( inc -dec- dec ) 5 ( 3 -1- 7 ) st/s across row ... 63 ( 71 -79- 85 ) sts.
Work 12 ( 14 -14- 16 ) rows rib as for Back or Front.
Cast off loosely.
Repeat Steps 1-12 to make the front.
To make one sleeve, use the 2.75mm needles. Cast on 37 ( 39 -41- 43 ) sts.
Work 12 ( 14 -14- 16 ) rows rib as for Back, inc 6 ( 8 -8- 8 ) sts evenly across last row ... 43 ( 47 -49- 51 ) sts.
Change to 3.25mm needles.
Work 4 rows stocking st.
For the fifth row, K2, M1 , knit to last 2 sts, M1 , K2.
Cont in stocking st (beg with a purl row), inc (as before) at each end of every 4th row until there are 57 ( 63 -71- 77 ) sts.
Work 5 ( 7 -7- 9 ) rows.
Cast off 4 ( 5 -6- 6 ) sts at beg of next 10 rows.
Cast off rem 17 ( 13 -11- 17 ) sts.
Repeat Steps 14-22 to make the second sleeve.
Using a flat seam, join shoulder seams, leaving 15 ( 16 -17- 18 ) cm free in centre for neck.
Using a backstitch, sew in the sleeves evenly between the coloured threads, placing the centre of the sleeves to the shoulder seams.
26. Join the side and sleeves seams. Make a button-loop on each front shoulder and sew buttons in position to correspond.
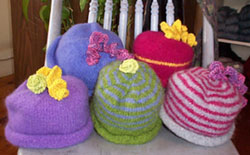
Materials: 1-4oz. skein of Steadfast Fibers Wonderful Wool or any other worsted
weight yarn.
Needles: US# 8 16” round and set of four US #8 double pointed or size to meet
gauge
Gauge: 4 stitches per inch
Cast on 90 st on 16” round needles.
Place marker and join, making sure there are no twists in the row.
Knit around until the piece measures 7” or desired length.
Next row: *knit 8 st then knit two stitches together * and repeat the section between the stars until you have finished the row.
Knit the next row around.
Next row: *knit 7 st then knit two together* repeat around. Knit the next row. *Knit 6 st, knit two together* around.
Knit next row.
You get the idea.
Continue reducing rows of K5, K2 tog, K4, K2 tog, K3, K2 tog, with each reducing row divided by a row of regular knitting. Change to double pointed needles when necessary. Then:
Continue reducing every row with no row in between until you have knit two together all the way around. Break the yarn, draw the end through the remaining stitches and tie it off. Weave in the ends and you’re ready to felt!
Felting
Get the hat soaking wet and place in a dyer set on high with either soaking wet old towels (no fresh linty ones) or soaking wet blue jeans. Heat and mechanical action felt wool. Let the cycle run for about 15 minutes, then open and check on progress. When the hat is the size you want (but still damp) remove from the dryer, otherwise, keep the dryer going and check every 3-5 minutes (less time the closer the hat gets to size).
Hat should still be damp! Do not allow the hat to actually get dry. Roll brim of hat upwards to shape, then set on flat surface to dry undisturbed. After about a _ day, check on dryness. Turn hat over (brim in the air) to dry the inside.

No comments:
Post a Comment