

FELTED HAT PATTERN
by Arlene Williams
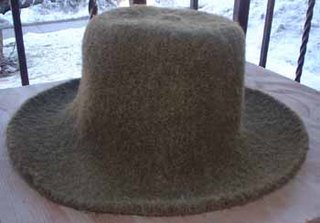
Photos of the hat follows the pattern.
This pattern is worked starting from the crown down to the brim instead of from the brim up. The reason I altered the pattern is that when felted, the crown on the brim-up hat has very obvious bumps which stand out. These are caused by the decreases necessary to work the crown.
By starting from the top down, you are increasing, and when felted, these lie flat. But it makes the start of the hat a little tricky, working with only 6 stitches on 4 needles.
Supplies:
200 gm Knitting Worsted Weight WOOL (I used old Patons "Classic Wool")
7.0 mm (US#11) dpn needles
7.0 mm 40 cm (US #11 16 inch) circular needle
marker or loop of yarn in contrasting colour
darning needle
NOTE: If you are not sure if the wool you have selected will felt, knit a swatch and felt it.
CROWN
With dpn's and TWO strands of wool, cast on 6 sts. Being careful not to twist stitches, join the knitting.
Row 1: Knit.
Row 2: Inc in each stitch around. (12 sts)
Rows 3, 5, 7, 9: Knit
Row 4: Increase in each stitch around. (24 sts)
Row 6: *K1, inc in next st*. Repeat around. (36 sts)
Row 8: *K2, inc in next st*. Repeat around. (48 sts)
Row 10: Inc 22 sts evenly. (70 sts)
Row 11: Knit.
HEAD
Change to circular needles, place a marker on the needles, and work evenly until 8 inches from the cast on stitches.
BRIM
Increase 15 stitches in the next row. (85 sts). Work evenly for 1 inch.
Increase 15 stitches in the next row. (100 sts). Work evenly for 2 inches.
Increase 15 sts in the next row. (115 sts). Work evenly until 13 inches total from the cast on stitches.
Cast off VERY loosely. If you cannot get the cast off loose enough, use larger needles. If the cast off is tight, the brim will not lie flat.
Felt in washer with hot water, little soap, and with some non-shedding dark clothes such as blue jeans (no terry towels). I kept taking the hat out and putting it into cold water to help with the felting.
When it has shrunk to the size that you want, towel dry, and put it on your head to shape it. I then lay it on a sweater dryer to keep the brim flat, but kept shaping it on my head. It took about 2 days for it to dry.
The top hat has a slightly rolled brim while the middle hat has a flat brim. Your choice. Shape the brim as it dries.
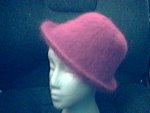
Materials:
2 skeins of BS Handpaint Originals (50 gr) 1 skein of BS Lamb's Pride Worsted
(100 gr), Circular needes sizes 13 and 11. DP needle size 11. Work the entire hat using 1 strand of each yarn.
Begin: Cast on 100 sts, loosely on needles. Join and Knit even for 2". Dec 10 sts. evenly around (90 sts). Change to and knit even for 3" (you now have a total of 5" knit). Dec 20 sts around (K3, K2 tog). Knit 8" more (13" total from beginning)
CROWN:
Row 1: K2 tog, K5,
Row 2: K
Row 3: K2, K2tog (change to DP needles now)
Row 4: K
Row 5: K2 tog, K1
Row 6: K2 tog around until you have about 6 sts left. Thread yarn into tapestry needle and pull to inside. Fasten tightly.
To Felt: Put into washing machine (small load size). Hot water/cold rinse with a little soap.
Complete cycle. It may take 2-3 cycles.
To shape: place over appropriately sized bowl, saucepan or wig form. Shape brim as desired.
Allow to dry (took nearly 3 days in my house).
I recently finished a felted hat and was so pleased w/results. The pattern if by Brown Sheep Co and is NOT copyrighted.
Pattern Note:
Doris mentioned that she made two of these hats and they were too small for her. I suggested she might want to try a needle size larger than called for in the pattern. Or another option would be to watch the felting process carefully.


No comments:
Post a Comment